If there is no centralized sewage system near the house, then the arrangement of a cesspool can be considered as a solution to the problem. In any house where there is a supply of hot and cold water supply, there is a problem of collecting and discharging sewage.
A cesspool is the easiest sewer option in a private or country house that you can do yourself.
Where should the cesspool be located?
To start, need to decide on a location on which the cesspool system will be equipped.
- directly on the site adjacent to a private or country house;
- arrangement is possible at a distance of at least 10 meters from the foundation of a residential building and other buildings on the backyard territory and to structures located in the neighborhood;
Important! This requirement is based on the fact that with a closer installation of a leaky pit without pumping out, the destruction of the foundations of nearby buildings, as well as their flooding, is possible.
- the distance from the pit to the fence is also regulated and must be at least one meter;
- depth should not be more than 3 meters. When choosing, you need to take into account the depth of the passage of groundwater;
- the pit must be at a certain distance (25 meters) from drinking wells.
Given distance depends on the type of soil in the backyard:
- With clay soil - no closer than 20 meters;
- With loamy soil - no closer than 30 meters;
- With sandy and sandy soil - a cesspool cannot be installed closer than 50 meters from the well.
Do-it-yourself cesspool device
 There are two main types of pit arrangement:
- sealed;
- plain without a bottom.
The option of arranging sewerage in a country or private house is determined by the location of the territory, the daily amount of wastewater and the material capabilities of the owner of the site:
- if the daily amount of sewage is not more than one cubic meter, it is possible to build a simple system without a bottom and without pumping. In a pit of this type, effluents partially go into the ground, in which they are cleaned by anaerobic bacteria. An example of this cesspool is the classic rural toilet;
- with a large amount of wastewater (more than a cubic meter), the construction of a sealed structure is required, which needs to be pumped out from time to time.
This requirement is explained by the fact that in the absence of a bottom in the pit, waste water passes into the ground and cleaning is carried out by microorganisms located in the depths of the earth. But their cleaning capabilities are not unlimited.
With large amounts of wastewater, microorganisms cannot cope with water purification. In this case, wastewater will begin to pollute the adjacent area and it is possible that they will pass into the water-bearing soil layers with further contamination of the drinking well.
If you need to dispose of a large amount of wastewater, you can consider the arrangement of a septic tank with filtration fields.
Do-it-yourself ordinary sewer
 The simplest waste system is done like this:
- digging a pit up to two meters deep, two meters wide and up to three meters long;
- the walls of the earth are laid or fixed;
- a layer of crushed stone is poured down;
- a protective cover with a cover is installed on top.
The main advantages of a pit without a bottom:
- ease of operation;
- low cost of construction and operation;
- simple and quick DIY construction.
Disadvantages of a pit without a bottom:
- groundwater level must be below the level of the sewage system;
- not suitable for sewerage of a large amount of sewage water;
- environmentally unsafe;
- possible unscheduled filling due to rainwater;
- has an unpleasant odor.
Sealed waste pit
A sealed sewage system is a sealed container where sewer water is pumped out through pipes. As the tank fills, sewage water must be pumped out with a special machine.
The main advantages of a sealed system:
- the installation site does not depend on the type of soil on the site;
- does not depend on the passage of groundwater;
- environmentally friendly, sewage water does not enter the environment.
Cons of sealed design:
- there is a smell if the drive is made in the form of a well;
- monthly costs (you need to periodically call a sewage truck for pumping);
- relatively high construction cost.
What to build a drain pit with your own hands
Consider the different types and methods of designing drainage systems that you can do yourself. They are conditionally divided into permanent and temporary.
From car tires
 If you need a drain system for a toilet in a country house at minimal cost, you can make it yourself using old car tires.
This is a quick and budget option for the construction of a sewer pit. The design is pretty simple. A pit is being made, where old tires are stacked one on top of the other. A layer of crushed stone is poured on the bottom of the pit, if desired, the tires are sealed with a clay lock.
Advantages:
- if necessary, easily restored;
- durability;
- speed, simplicity and low cost of construction.
Flaws:
- tires rot over time;
- the possibility of a negative impact on the environment with a high load on the structure;
- rapid siltation with insufficient cleaning and pumping out, as a result, useful area is lost.
From concrete rings
 This is another way to quickly build a drain system. Its design is similar to a well. Rings are stacked on top of each other. The connections between them, if desired, are sealed with a cement screed.
By its design, a sewer pit made of concrete rings refers more to hermetic structures. That's why you need to pump it regularly. Although there is an option to install a septic tank from concrete rings.
Main advantages:
- convenience of the device of a protective cover with the hatch;
- durability;
- the possibility of building with your own hands;
- relatively low cost.
Flaws:
- the possibility of an unpleasant odor from the ventilation pipes;
- the need for periodic pumping;
- laborious installation.
Drainage pit made of bricks
This is the most successful and optimal option if you need a drain system for a toilet or bath in a country house.
Advantages:
- ease of construction - almost any summer resident can handle bricklaying for a drain pit;
- environmental friendliness - the contents of the drain structure are periodically pumped out by a sewage machine.
Flaws:
- siltation. It is possible to prevent silting with the help of constant pumping out of the liquid in the storage tank;
- relatively short service life (up to 20 years), as a result of the destruction of bricks in unfavorable conditions of the drain system;
- Periodically, an unpleasant odor is likely to form. The use of various preparations that accelerate the processes of waste decomposition and timely pumping out of the drive can help to cope with this.
Construction of a brick pit
 First you need to decide on the installation site of the drain pit, observing all the rules and taking into account ease of use.
We choose a design. Given the purpose, a drain brick pit can be rectangular, square or round.
We calculate the required volume, dimensions and prepare the pit for the pit.
With a rectangular design, we tilt the bottom towards the installation of the hatch. We pour a sand cushion at the bottom of the pit, with a layer of 20 cm and fill it with cement mortar. You can take a finished reinforced concrete slab of the required size. A cement screed is made on top.
We do wall laying. The optimal thickness of the walls is 30 cm. It is advisable to lay the walls in a checkerboard pattern in half a brick. Laying in a quarter of a brick is possible.
Then, when the walls are ready, you need to treat them with bituminous mastic or make a clay castle from the outside for better sealing. If necessary, then plaster the inner surface.
Installation of the hatch and ceiling
Then, when the base of the drain pit is ready, we install a ceiling with a hatch. Overlap is required not less than 50 cm close the hole around the perimeter.
In the role of overlap, concrete slabs are chosen or logs are carefully laid. When arranging the cesspool floor, it is necessary to provide a location for the hatch. The hatch is made in the size of 70 cm.
On top of the stele overlap, waterproofing from a film or roofing felt. We cover the waterproofing with a layer of slag or soil measuring 0.5 m.
Attention! To protect against the appearance of a smell from the drain pit and its freezing, the hatch into the pit is installed double. The top cover is located on the surface of the earth, and the other at the level of the ceiling. The space that has appeared in the bow is filled with heat-insulating materials (slag, expanded clay, polystyrene, etc.).
Sewer pit from a barrel
This is an excellent option for arranging do-it-yourself water runoff with natural cleaning of the cesspool with small amounts of runoff (up to 1 cubic meter).
Barrel preparation:
- we use a 200 liter barrel, best of all from a material that does not corrode, we make holes in the wall in a checkerboard pattern for drainage with a drill or grinder. It is desirable to make holes with a distance of 15-25 centimeters;
- we tightly fasten a pipe to the bottom of the barrel for connecting a drain pipe. To ensure sealing, you can use silicone sealants. We process the connection area of the pipe with mastic;
- we wrap the barrel with geotextile and firmly fasten it with twine. This is necessary to ensure that the tank is protected from soil and other foreign particles entering its structure while maintaining normal drainage.
Installation of a cesspool sewer system:
- we make a trench and lay sewer pipes, certainly with a slope;
- we prepare a pit with a depth and size slightly higher than the depth of the barrel;
- down the pit we fall asleep gravel or gravel with a layer of 20 cm;
- we put a barrel on this pillow and connect the drain pipe;
- the resulting space between the walls of the pit and the container is filled with gravel or gravel;
- We connect the sewer pipe to the installed pipe.
Now the sewer pit for your bath is ready. You can also make a drain hole for the toilet with your own hands.
As an option for arranging a home sewer system, you can consider installing a cesspool concrete drain pit.
Stages of construction of a concrete pit:

Using this technology, you can also make a drain hole for the toilet with your own hands.
Summarizing
There are quite a few options to build a drain cesspool yourself. Choosing a specific solution, taking into account specific conditions and material possibilities. You can also consider installing a septic tank or buying a ready-made kit for arranging a drain pit.
If a person lives in a house, it must have sewerage, since waste products still need to be disposed of somehow. And it's hard to disagree with that, isn't it? The modern industry offers many solutions: from multi-section septic tanks to neat dry closets. But the usual cesspool in a private house is still relevant and in demand.
But, before proceeding with the construction of a cesspool on the site, you will have to weigh the pros and cons. After all, an incorrectly chosen place, and the design of the cesspool itself, subsequently, threatens to turn into many problems. The most common of these is the appearance of an unpleasant odor. We will tell you how to avoid this problem.
In the article, we have collected and summarized information about the types and design features of cesspools. In addition, here you can find useful tips and recommendations on how to choose and build a sewer on the site. The material is accompanied by thematic photos and videos.
A cesspool is perhaps the oldest and simplest type of sewage. It is a depression in the ground in which sewage is accumulated and partially processed.
Any drain contains a certain amount of bacteria that absorb and convert these accumulations. Part of the filtered effluent passes into the underlying soil.
Everything that has not been recycled and has not gone into the underlying layers should be periodically removed from the cesspool so that the container does not overflow.
Image Gallery
Sewerage in a country or rural house at the present time is no longer an exception, but rather the rule, so the arrangement of such a blessing of civilization is attracting more and more attention from owners of private houses.
A drain pit is an integral part of any sewage system and you can build it yourself quite inexpensively, using improvised materials for this purpose.
Making a drain pit with your own hands will be discussed in our article.
Where to start building
Before starting construction, it is necessary to develop a plan
Before proceeding with the construction of a drain system, it is necessary to sketch out a plan on a piece of paper, respecting the scale and taking into account the following requirements:
- The distance to the foundation of a house or other structure is not closer than 5 m.
- The distance to a water well, cellar or well is at least 20 m, and preferably 30 m.
- The distance to the border of the site is not closer than 1 m, and then if there is no neighboring water intake outside the border of your site.
- There is a convenient entrance for a sewage truck, since from time to time the drains will have to be pumped out.
Pay your attention: the requirements listed above are the requirements for SanPin, but they need to be clarified in the local sanitary supervision, since in each region, their own nuances can be added.
Decide on the type of drain

It is necessary to determine the type of drain
Before you start building a drain pit, you need to decide on the type of drain. The type of drain pit depends on its design and happens:
- Cumulative.
- Filtering.
Cumulative type, as the name implies, serves to collect wastewater, followed by pumping. That is, the entire volume of wastewater is periodically pumped out by special vehicles and taken out for disposal.
A device of this type is simpler and therefore cheaper, but if 4 or more people permanently live in the house, then the operation will be quite expensive, since the pit will have to be cleaned quite often, and this service is paid.
filter type more difficult to build, due to the fact that you have to make a filtering system, but then most of the drains will go into the ground, and pumping will be done much less frequently. Therefore, the operation of such a drain will be cheaper.
For the storage type, it is necessary to build a sealed well; such a well can be made from various materials:
- concrete rings;
- bricks;
- plastic or metal container.
In a concrete or brick well, it is necessary to concrete the bottom and seal the seams, this is a difficult and expensive job, and the concrete rings themselves are expensive.
In addition, a crane is required to install the rings, for which you will also have to pay. Brick, somewhat cheaper, but high-quality masonry and especially wall sealing can only be done by a specialist, so these options are not considered by us.
It is much easier to make a well from a plastic or metal container, you just need to decide on the volume. It is usually taken as a multiple of the service car, 4, 6, 8 cubes and takes into account the number of people living in the house.
Stages
It is quite affordable to make a drain pit from a finished container with your own hands; for this, you only need desire and diligence. Let's take a closer look at the stages of construction.
- We are preparing a pit
- Digging a trench
- Pipeline laying
- Backfill
We mark the place for the pit under the container. The dimensions of the pit should be 15–20 cm larger than the container, and the depth should be such that at least 1 meter from the top of the container to the ground.
We place the container in the pit, if it is made of plastic, this can be done without the help of additional equipment, but using cables.
Having installed the container in the pit, you must make sure that the height from its top to the ground is at least 1 meter. If the thickness of the soil over the tank is less than 1 meter, then it is necessary, before backfilling, to make thermal insulation with any insulation with a thickness of 100-150 mm.
We begin to dig a trench from the house to the pit, the depth of the trench near the house can be 0.5–0.7 m and have a slope towards the pit. This slope should be within 2–3 cm per meter of trench length.
Take note: the slope must be kept within these limits, because with a smaller slope, the flow worsens, especially of solid particles, and with a larger slope, the liquid part flows faster than the solid fraction moves and the pipes will gradually become clogged.
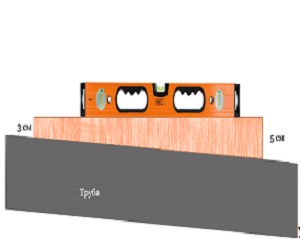
Pipeline Slope Control Device
A sand cushion of 20-25 cm is poured at the bottom of the trench, a pipeline is laid on it, controlling its slope. To control the slope of the pipeline, a special device is used, it consists of a building level, which is placed on a specially made rail 1 m long and one end 3 cm thick and the other 5 cm thick.
This rail with a level is placed on the pipeline and pouring or vice versa removing sand from under the pipe, they achieve a zero reading on the level scale.
First, carefully, manually sprinkle the pipeline by 20-30 cm, lightly tamp, the final backfill, if possible, can be continued with a bulldozer, or manually. Having finished with backfilling and leveling, you can begin to operate the system.
As mentioned at the beginning, the operation of this system is quite expensive, so it can be improved by building a filter well, where clarified water will flow, and the solid fraction will accumulate in the storage well. In this case, it will be necessary to pump out several times less often, once or twice a year.
Drainage pit at their summer cottage can be improved
So, our system will consist of two parts:
- Accumulative drain pit from a finished container that we have already built.
- Filtering well, the construction of which we will now consider.
The filter well should not be airtight; on the contrary, water will go into the ground through the holes in it.
It can be made from brick, a metal pipe, and the easiest way is to use old car or tractor tires. The durability of such a well made of tires is at least 12–15 years.
To make such a well, you need:
- Prepare tires. It is not necessary to choose them in the same size, the main thing is that they do not fall into one another. Their number will depend on the height of the well and the thickness of the tires. For example, if we take tires from the Don combine, 3 of them are enough.
- We are preparing a hole with a diameter of 0.5 m larger than the tires.
- We fall asleep at the bottom of the pit 30-40 cm of sand, then 30-40 gravel, carefully level and tamp.
- We put the tires one on top of the other, and carefully fill the gap between the walls of the pit and the tires with soil, ramming it.
- To insert a pipeline in one of the tires, the higher the better, we cut a hole according to the diameter of the pipe. We lay, not forgetting about the slope, the pipe and carefully fill the soil.
- We make a cover on the well from metal or wood.
Builder Tip: the filtering well should be buried 0.5-0.7 m deeper than the storage tank. The pipeline cuts into the drive at a level ¾ from its bottom, and enters the filter well as high as possible, but this is not necessary.
Our custom drain system is ready.
It turns out that making a drain hole with your own hands will not be difficult, you just need to follow these not tricky rules. This will save you a significant amount.
The creation of a sewerage system in a private house will qualitatively change the living conditions in it, bringing it closer in comfort to a city apartment, and compliance with SanPin standards will protect nature from pollution and you from fines.
Detailed video instruction about how to build a drain pit in a private house with your own hands, you can here:
1.
2.
3.
4.
5.
To ensure a comfortable stay in a private house, its owner has to make a lot of efforts. This applies to the maintenance of all engineering communications, including the sewerage system, which in its own household consists of a cesspool and sewers.
A cesspool with a volume of 2 cubic meters is capable of processing waste, provided that no more than two family members live permanently in the house or the building is used only for temporary stay in it. The drain pit should be cleaned often, and this costs money and a lot, since you need to order a sewer truck. Experts recommend building a high-quality treatment plant on the site, pumping out the contents of which will be required much less frequently.
Choice of pit type
Before digging a drain hole, you should familiarize yourself with their main types:- An earthen tank without a bottom is the most popular. Due to the lack of a concrete base, the liquid partially sinks into the soil and drains are collected very slowly in the tank. Cleaning it is done no more than once every few months.
The design without a bottom, such as in the photo, has a number of serious drawbacks. Drainage and sewage gradually pollute the soil and groundwater, so the digging of drain holes should be carried out at a certain distance from the house, but not closer than 5 meters. In addition, this type of sewage structure loses its filtering capacity over time due to the gradual silting of the bottom.
A two-chamber septic tank has a more complex design. The waste liquid first enters the first tank, where large wastes settle. The bacteria then proceed to process the contents. The first chamber is connected to another container by means of a drain pipe. Thus, a fine-grained cleaner liquid enters the second part of the septic tank. There, the drains are finally settled.
The second container has a similar device as the first part of the treatment plant. In it, bacteria continue to process wastewater. Both chambers are cleaned approximately 1-2 times during the year. At the outlet of the septic tank, water is obtained that is quite suitable for technical use, for example, for irrigation. It can also be dumped into a nearby body of water.How to dig a drain hole correctly
There are certain sanitary standards that regulate how to properly dig a drain hole. Initially, you should choose a place where the pit will be built. See also: "".
The minimum depth of the drain pit should be 2 meters, despite the fact that the groundwater level is below this mark. Also, the pit should be located at a distance of at least 30 meters from a water source, such as, for example, a well. The minimum distance from the well to the cesspool must in no case be reduced.
Before digging a drain hole, you need to make sure that it will be located at a distance of at least 5 meters from a residential building. It is impossible for the sewage ditch to be on the slope of the site and far from the road (this is required in order to pump out sewage with the help of special equipment if necessary). See also: "".The pit is dug both manually and with the help of an excavator. Its width should exceed the estimated width of the pit by about 50 centimeters for interior lining. When calculating the depth of the future pit, the thickness of the bottom filling with a concrete solution is taken into account. In addition to the pit, you need to dig trenches for laying sewers.

The walls of the drain pit and its cover
A home craftsman needs to know not only how to dig a drain hole, but also be able to finish its walls.A drainage cushion is laid at the bottom of the pit, consisting of sand and several layers of rubble. A reinforced concrete slab is placed on it or a concrete screed is made. When a filter pit is created, a 20-cm layer of rubble, stones, broken brick or cinder block is poured onto its bottom.
From materials for wall decoration you can use:
- concrete solution. Formwork is pre-installed with inserted rods, and then the walls are poured. The thickness of the concrete layer must be at least 7 centimeters;
- Red brick. They lay out the walls from the bottom to the very top;
- reinforced concrete poles. They are placed on the cement mortar in a row. In order to avoid collapse, limiters are made on both sides of the masonry;
- concrete rings. A crane is required for their installation. The rings are placed on a concrete base, equipped at the bottom of the pit. The joints between the elements are coated with cement mortar;
- the simplest solution is a ready-made container (plastic as an option) placed in a pit. Before you dig a drain hole, you need to know the parameters of the tank (purchased tank) so that they match its size.

When finishing the walls, at the same time the pit is connected to the sewers. They should be connected tightly with the material of the walls, but not rigidly. This is done in order to prevent damage to the pipes in the process of soil sedimentation. It is advisable to use rubber connectors and adapters with a sufficient degree of strength. Outside, the pit is trimmed with roofing material in several layers or with oily clay.
It is impossible to cover the hermetically drain pit, since it must communicate with the atmosphere. In addition, the lid must have a hole for pumping sewage through it. Therefore, slate sheets are the best option for covering the pit. To do this, wooden logs are placed on top of the pit. When the pit needs to be slightly opened, the sheets are removed and set aside. For such an overlap of the pit, it is required to make insulation for the winter.
Another option is a concrete slab with a cleaning hole. Sometimes you can make an overlap from the boards. Regardless of the type of cover for the waste pit, rain and melt water should not enter the pit.
Chemical preparations for septic tanks and pits
For drain pits, there is a huge selection of various bioactivator products on sale. They are produced in the form of solutions, powders, tablets, etc. These drugs contain strains of microorganisms that can process human waste very quickly. Bacteria feed on organic matter and consume oxygen, which is dissolved in wastewater.As a result, microorganisms in the shortest possible time relieve the surrounding space near the pit from the stench and decompose sewage into separate components.
In the suburban area, I want to create the most comfortable living conditions.
There is usually no central sewerage in such areas.
There is no need to purchase and install expensive equipment, such as a septic tank.
Most people live in the country during the warm season. You can solve the problem with waste disposal by equipping a drain pit with your own hands.
Before starting the construction of a drain pit in the country, you should pay attention to the following factors

To determine the required volume of the drain pit, it is taken into account
- The number of people living in the house. Average consumption 200l/day per person.
- Accommodation. Permanent or temporary
Attention! a cesspool is dug no less than 5 meters from the dwelling and 25 meters from the water source.
There are two types of holes
- without bottom
- Sealed.
Pit for drains without a bottom
The simplest type of construction. Drains go into the ground on their own, waste and garbage are pressed. After operation, the pit is dug in and settled in a new place, or vacuum trucks are called, and pumping is performed.
Such a pit is not designed for a large amount of wastewater, a maximum of one cubic meter. This type of structure is not allowed to be installed above the water source. Drainage can spoil drinking water.
The main disadvantage of such pits is the mass of restrictions during construction. 50 meters from all water intakes, location level, groundwater accounting, distance from home, etc. for non-compliance with standards and pollution of groundwater, a large fine is charged.
Tire Pit:
- A pit is being prepared with a depth of not more than 0.8 m.
- The bottom is covered with large gravel, the layer thickness is 0.4 m
- Tires are being prepared. The sides are aligned for a snug fit. On the last part of the wheel, a hole is made for the drain pipe.
- Tires are installed one on top of the other, extremely evenly.
- The pit is filled with soil and covered with a lid.
Pit from a plastic barrel:

Sealed pits
Such structures are much more reliable than the previous ones. Their installation does not depend on the occurrence of groundwater, they do not harm the environment. A pit is assembled from materials such as wood, concrete and concrete rings, brick. When the structure is ready, waterproofing is performed. Such a hole can be of any size.
Brick pit:
- A pit breaks out
- The bottom is covered with sand and gravel, well compacted and poured with cement mortar.
- After solidification of the bottom. The walls are lined with bricks. You can use any brick, even second-hand or make laying of stone.
- The outer side of the brick structure is waterproofed with roofing material.
- The space between the roofing material and the ground is filled with concrete mortar.
Pit from reinforced concrete rings:
Installation is more labor intensive. A crane will be required to install the rings or an auxiliary structure is being built for this purpose.
- The pit is being prepared
- The rings are lowered and connected by grooves. The number of rings depends on the depth of the hole. The standard ring height is 1 m.
- Joints are sealed with cement mortar.
- The bottom is being equipped (the technology is the same for sealed pits)
- The void between the rings and the ground is filled with soil.
The design has clear advantages - reliability and long service life.
plastic pit:
The structure is sold ready-made. Installed in a pit. Fall asleep with soil. Plastic is the most durable and reliable material.
Wood pit:
Installation is difficult. And wood is not a cheap material.

Concrete pit:
- A pit of the desired size and depth breaks out
- Assembling formwork
- Poured with concrete
- After the walls harden, the auxiliary structure is removed and the bottom is made.
- After complete drying, the pit is ready.
Conclusion
Two-chamber home-made septic tanks are also being built.
Sometimes two types of drain pits are used in one area. Without a day for a shower, washbasin, bath, but sealed for the kitchen and toilet.
Attention!
For any type of pit, a hole is needed for the supply of a sewer pipe. Pipes are laid under a slope of 7 cm, to organize a good gravity flow.
Sealed pits are subject to periodic cleaning of solid sediment. Bacteria can be added to closed-type pits, and bioactivators can be added for better decay. You will have to call the vacuum cleaners much less often.
Pits made of concrete, concrete rings and bricks can be without a bottom.
Aerobic microorganisms can be added to drainage pits. They are of natural origin and do not harm the environment, help speed up the process of splitting, these bacteria require oxygen to work.